
Cette fois, je vous propose de partager avec vous comment passer de OpenVPN à NordLynx et on verra comment avoir un fonctionnement en mode service si on passe par une app comme cell de NordVPN.
Donc repartons donc à partir du rapsberry pi déjà configurer en tant de Gateway VPN avec OpenVPN.
1) Arrêter OpenVPN et désactiver en mode service pour ne pas perturber NordLynx.
pi@raspberrypi:~ $ sudo service openvpn stop
pi@raspberrypi:~ $ sudo systemctl disable openvpn
Synchronizing state of openvpn.service with SysV service script with /lib/systemd/systemd-sysv-install.
Executing: /lib/systemd/systemd-sysv-install disable openvpn
Removed /etc/systemd/system/multi-user.target.wants/openvpn.service.
pi@raspberrypi:~ $
2) Installation de l'app NordVPN :
En 4 commandes finalement....
pi@raspberrypi:~ $ sudo wget -qnc https://repo.nordvpn.com/deb/nordvpn/debian/pool/main/nordvpn-release_1.0.0_all.deb
pi@raspberrypi:~ $ sudo dpkg -i nordvpn-release_1.0.0_all.deb
Selecting previously unselected package nordvpn-release.
(Reading database ... 40158 files and directories currently installed.)
Preparing to unpack nordvpn-release_1.0.0_all.deb ...
Unpacking nordvpn-release (1.0.0) ...
Setting up nordvpn-release (1.0.0) ...
pi@raspberrypi:~ $ sudo apt update
Get:1 http://archive.raspberrypi.org/debian buster InRelease [32.6 kB]
Get:2 http://raspbian.raspberrypi.org/raspbian buster InRelease [15.0 kB]
Get:3 https://repo.nordvpn.com/deb/nordvpn/debian stable InRelease [6,174 B]
Get:4 http://archive.raspberrypi.org/debian buster/main armhf Packages [330 kB]
Get:5 https://repo.nordvpn.com/deb/nordvpn/debian stable/main armhf Packages [3,459 B]
Fetched 387 kB in 3s (130 kB/s)
Reading package lists... Done
Building dependency tree
Reading state information... Done
9 packages can be upgraded. Run 'apt list --upgradable' to see them.
pi@raspberrypi:~ $ sudo apt install nordvpn
Reading package lists... Done
Building dependency tree
Reading state information... Done
The following additional packages will be installed:
  ipset libipset11 libxslt1.1 xsltproc
The following NEW packages will be installed:
  ipset libipset11 libxslt1.1 nordvpn xsltproc
0 upgraded, 5 newly installed, 0 to remove and 9 not upgraded.
Need to get 7,460 kB of archives.
After this operation, 26.0 MB of additional disk space will be used.
Do you want to continue? [Y/n] Y
Get:1 http://mirrors.ircam.fr/pub/raspbian/raspbian buster/main armhf libipset11 armhf 6.38-1.2 [48.8 kB]
Get:2 http://mirrors.ircam.fr/pub/raspbian/raspbian buster/main armhf ipset armhf 6.38-1.2 [49.1 kB]
Get:3 http://ftp.igh.cnrs.fr/pub/os/linux/raspbian/raspbian buster/main armhf libxslt1.1 armhf 1.1.32-2.2~deb10u1 [215 kB]
Get:4 http://ftp.igh.cnrs.fr/pub/os/linux/raspbian/raspbian buster/main armhf xsltproc armhf 1.1.32-2.2~deb10u1 [121 kB]
Get:5 https://repo.nordvpn.com/deb/nordvpn/debian stable/main armhf nordvpn armhf 3.7.3 [7,026 kB]
Fetched 7,460 kB in 4s (1,826 kB/s)
Selecting previously unselected package libipset11:armhf.
(Reading database ... 40160 files and directories currently installed.)
Preparing to unpack .../libipset11_6.38-1.2_armhf.deb ...
Unpacking libipset11:armhf (6.38-1.2) ...
Selecting previously unselected package ipset.
Preparing to unpack .../ipset_6.38-1.2_armhf.deb ...
Unpacking ipset (6.38-1.2) ...
Selecting previously unselected package libxslt1.1:armhf.
Preparing to unpack .../libxslt1.1_1.1.32-2.2~deb10u1_armhf.deb ...
Unpacking libxslt1.1:armhf (1.1.32-2.2~deb10u1) ...
Selecting previously unselected package xsltproc.
Preparing to unpack .../xsltproc_1.1.32-2.2~deb10u1_armhf.deb ...
Unpacking xsltproc (1.1.32-2.2~deb10u1) ...
Selecting previously unselected package nordvpn.
Preparing to unpack .../nordvpn_3.7.3_armhf.deb ...
Unpacking nordvpn (3.7.3) ...
Setting up libxslt1.1:armhf (1.1.32-2.2~deb10u1) ...
Setting up libipset11:armhf (6.38-1.2) ...
Setting up ipset (6.38-1.2) ...
Setting up xsltproc (1.1.32-2.2~deb10u1) ...
Setting up nordvpn (3.7.3) ...
NordVPN for Linux successfully installed!
To get started, type 'nordvpn login' and enter your NordVPN account details. Then type 'nordvpn connect' and you’re all set! If you need help using the app, use the command 'nordvpn --help'.
Processing triggers for systemd (241-7~deb10u4+rpi1) ...
Processing triggers for man-db (2.8.5-2) ...
Processing triggers for libc-bin (2.28-10+rpi1) ...
pi@raspberrypi:~ $
Quand c'est installé, on peut voir que l'appli propose pas mal d'option en tapant juste la commande "nordvpn" :
pi@raspberrypi:~ $ nordvpn
Welcome to NordVPN Linux client app!
Version 3.7.3
Website: https://nordvpn.com

Usage: nordvpn [global options] command [command options] [arguments...]

Commands:
     account        Shows account information
     cities         Shows a list of cities where servers are available
     connect, c     Connects you to VPN
     countries      Shows a list of countries where servers are available
     disconnect, d  Disconnects you from VPN
     groups         Shows a list of available server groups
     login          Logs you in
     logout         Logs you out
     rate           Rate your last connection quality (1-5)
     register       Registers a new user account
     set, s         Sets a configuration option
     settings       Shows current settings
     status         Shows connection status
     whitelist      Adds or removes an option from a whitelist
     help, h        Shows a list of commands or help for one command

Global options:
   --help, -h     show help
   --version, -v  print the version

For more detailed information, please check manual page.

Our customer support works 24/7 so if you have any questions or issues, drop us a line at https://support.nordvpn.com/
pi@raspberrypi:~ $
3) Configuration de la connexion
On va donc pouvoir sauvegarder d'abord nos information de compte (login/password) avec la commande "nordvpn login" :
(sauvegardé dans le fichier /.config/nordvpn/nordvpn.conf)
pi@raspberrypi:~ $ nordvpn login
Please enter your login details.
Email / Username: email.bidon@gmail.com
Password:
Welcome to NordVPN! You can now connect to VPN by using 'nordvpn connect'.
pi@raspberrypi:~ $
4) Configuration du protocole pour utiliser NordLynx (basé sur WireGuard pour rappel) et pas OpenVPN
pi@raspberrypi:~ $ nordvpn set technology nordlynx
Technology is successfully set to 'NordLynx'.
pi@raspberrypi:~ $
4) Pour se connecter en 'France' et vérifier ensuite son l'IP
pi@raspberrypi:~ $ nordvpn connect fr
Connecting to France #587 (fr587.nordvpn.com)
You are connected to France #587 (fr587.nordvpn.com)!
pi@raspberrypi:~ $
pi@raspberrypi:~ $ wget  http://ipinfo.io/ip  -qO -
212.83.161.152
pi@raspberrypi:~ $
5) Un petit speed test en CLI au passage ;-)
(besoin d'installer des choses aussi ;-)
pi@raspberrypi:~ $ sudo apt-get install gnupg1 apt-transport-https dirmngr
Reading package lists... Done
Building dependency tree
Reading state information... Done
dirmngr is already the newest version (2.2.12-1+rpi1+deb10u1).
The following additional packages will be installed:
  gnupg1-l10n libcurl3-gnutls
Suggested packages:
  parcimonie xloadimage | imagemagick | eog
The following NEW packages will be installed:
  apt-transport-https gnupg1 gnupg1-l10n libcurl3-gnutls
0 upgraded, 4 newly installed, 0 to remove and 9 not upgraded.
Need to get 1,517 kB of archives.
After this operation, 5,553 kB of additional disk space will be used.
Do you want to continue? [Y/n] Y
Get:1 http://mirrors.ircam.fr/pub/raspbian/raspbian buster/main armhf apt-transport-https all 1.8.2.1 [149 kB]
Get:2 http://mirrors.ircam.fr/pub/raspbian/raspbian buster/main armhf libcurl3-gnutls armhf 7.64.0-4+deb10u1 [292 kB]
Get:3 http://mirrors.ircam.fr/pub/raspbian/raspbian buster/main armhf gnupg1 armhf 1.4.23-1 [524 kB]
Get:4 http://mirrors.ircam.fr/pub/raspbian/raspbian buster/main armhf gnupg1-l10n all 1.4.23-1 [552 kB]
Fetched 1,517 kB in 2s (804 kB/s)
Selecting previously unselected package apt-transport-https.
(Reading database ... 40227 files and directories currently installed.)
Preparing to unpack .../apt-transport-https_1.8.2.1_all.deb ...
Unpacking apt-transport-https (1.8.2.1) ...
Selecting previously unselected package libcurl3-gnutls:armhf.
Preparing to unpack .../libcurl3-gnutls_7.64.0-4+deb10u1_armhf.deb ...
Unpacking libcurl3-gnutls:armhf (7.64.0-4+deb10u1) ...
Selecting previously unselected package gnupg1.
Preparing to unpack .../gnupg1_1.4.23-1_armhf.deb ...
Unpacking gnupg1 (1.4.23-1) ...
Selecting previously unselected package gnupg1-l10n.
Preparing to unpack .../gnupg1-l10n_1.4.23-1_all.deb ...
Unpacking gnupg1-l10n (1.4.23-1) ...
Setting up apt-transport-https (1.8.2.1) ...
Setting up gnupg1-l10n (1.4.23-1) ...
Setting up libcurl3-gnutls:armhf (7.64.0-4+deb10u1) ...
Setting up gnupg1 (1.4.23-1) ...
Processing triggers for install-info (6.5.0.dfsg.1-4+b1) ...
Processing triggers for libc-bin (2.28-10+rpi1) ...
Processing triggers for man-db (2.8.5-2) ...
pi@raspberrypi:~ $ export INSTALL_KEY=379CE192D401AB61
pi@raspberrypi:~ $ export DEB_DISTRO=$(lsb_release -sc)
pi@raspberrypi:~ $ sudo apt-key adv --keyserver keyserver.ubuntu.com --recv-keys $INSTALL_KEY
Executing: /tmp/apt-key-gpghome.l9IaWIYstj/gpg.1.sh --keyserver keyserver.ubuntu.com --recv-keys 379CE192D401AB61
gpg: key 379CE192D401AB61: public key "Bintray (by JFrog) <bintray@bintray.com>" imported
gpg: Total number processed: 1
gpg:               imported: 1
pi@raspberrypi:~ $ echo "deb https://ookla.bintray.com/debian ${DEB_DISTRO} main" | sudo tee  /etc/apt/sources.list.d/speedtest.list
deb https://ookla.bintray.com/debian buster main
pi@raspberrypi:~ $ sudo apt-get update
Hit:1 http://raspbian.raspberrypi.org/raspbian buster InRelease
Hit:2 http://archive.raspberrypi.org/debian buster InRelease
Ign:3 https://ookla.bintray.com/debian buster InRelease
Get:4 https://ookla.bintray.com/debian buster Release [4,387 B]
Get:5 https://ookla.bintray.com/debian buster Release.gpg [821 B]
Hit:6 https://repo.nordvpn.com/deb/nordvpn/debian stable InRelease
Get:7 https://ookla.bintray.com/debian buster/main armhf Packages [398 B]
Fetched 5,606 B in 3s (1,816 B/s)
Reading package lists... Done
pi@raspberrypi:~ $ sudo apt-get install speedtest
Reading package lists... Done
Building dependency tree
Reading state information... Done
The following NEW packages will be installed:
  speedtest
0 upgraded, 1 newly installed, 0 to remove and 9 not upgraded.
Need to get 836 kB of archives.
After this operation, 1,891 kB of additional disk space will be used.
Get:1 https://ookla.bintray.com/debian buster/main armhf speedtest armhf 1.0.0.2-1.5ae238b [836 kB]
Fetched 836 kB in 1s (1,385 kB/s)
Selecting previously unselected package speedtest.
(Reading database ... 40304 files and directories currently installed.)
Preparing to unpack .../speedtest_1.0.0.2-1.5ae238b_armhf.deb ...
Unpacking speedtest (1.0.0.2-1.5ae238b) ...
Setting up speedtest (1.0.0.2-1.5ae238b) ...
Processing triggers for man-db (2.8.5-2) ...
Et pour lancer le test finalement:
pi@raspberrypi:~ $ speedtest
==============================================================================

You may only use this Speedtest software and information generated
from it for personal, non-commercial use, through a command line
interface on a personal computer. Your use of this software is subject
to the End User License Agreement, Terms of Use and Privacy Policy at
these URLs:

        https://www.speedtest.net/about/eula
        https://www.speedtest.net/about/terms
        https://www.speedtest.net/about/privacy

==============================================================================

Do you accept the license? [type YES to accept]: YES
License acceptance recorded. Continuing.

==============================================================================

Ookla collects certain data through Speedtest that may be considered
personally identifiable, such as your IP address, unique device
identifiers or location. Ookla believes it has a legitimate interest
to share this data with internet providers, hardware manufacturers and
industry regulators to help them understand and create a better and
faster internet. For further information including how the data may be
shared, where the data may be transferred and Ookla's contact details,
please see our Privacy Policy at:

       http://www.speedtest.net/privacy

==============================================================================

Do you accept the license? [type YES to accept]: YES
License acceptance recorded. Continuing.


   Speedtest by Ookla

     Server: ORANGE FRANCE - Paris (id = 24215)
        ISP: Dedibox SAS
    Latency:     8.98 ms   (0.80 ms jitter)
   Download:    19.58 Mbps (data used: 17.6 MB)
     Upload:     1.66 Mbps (data used: 1.8 MB)
Packet Loss:     0.7%
 Result URL: https://www.speedtest.net/result/c/9af7696b-a77b-4531-bd67-34d0c0446dc9
Résultat:
- Nordlynx: 19.59 Mbps en download / 1.64 Mbps en upload / 8.40 ms de ping
- OpenVPN: 19.15 Mbps en download / 1.61 Mbps en upload / 9.93 ms de ping
Franchement.. ce n'est pas vraiment différent voir pas du tout, déçu :-( !!! on verra en heure de pointe peut être que c'est différent !!!
6) Pour démarrer en auto comme un service pour les prochains démarrages (optionel parce que contraignant finalement!) :
pi@raspberrypi:~ $ nordvpn set autoconnect on fr
Auto-connect is set to 'enabled' successfully.
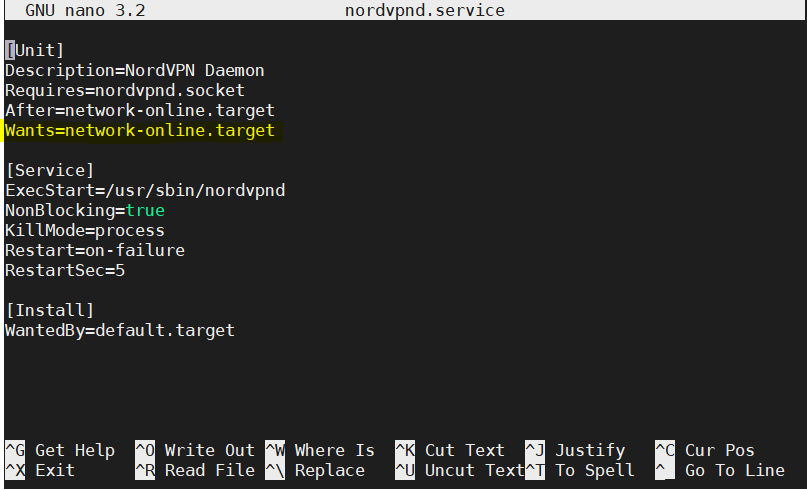
Attention, il y a un bug dans le deamon de NordVPN, l'autoconnect ne va rien faire finalement, il faut rajouter la ligne 'Wants=network-online.target' dans la section [Unit] du fichier /etc/systemd/system/nordvpnd.service ainsi:
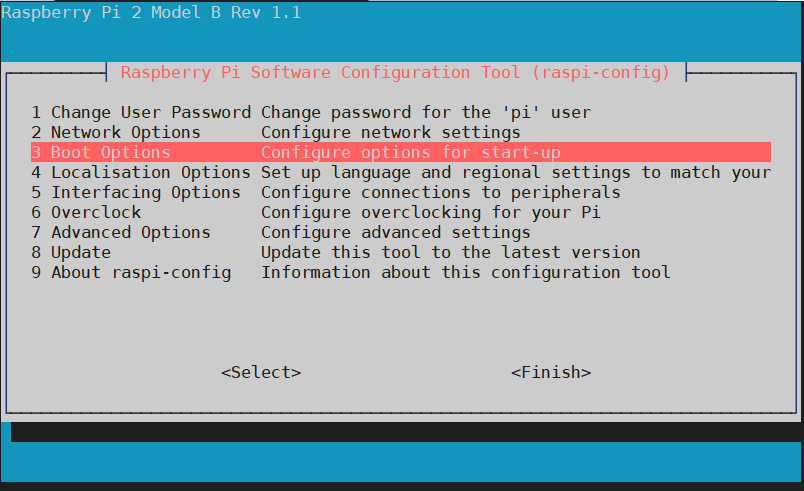
Et il faudra aussi activer via "sudo raspi-config" la fonctionalité de wait network au boot :


Contrainte: l'autoconnect a ses limites, par exemple, si on laisse NordVPN se lancer sans modifier l'iptable dans la foulé, on n'a plus d'accès SSH, je comprends pourquoi pour des raisons de sécurité mais on ne peut plus administrer à distance, il faut clavier et ecran dispo pour le faire en local. C'est un choix à prendre, je ferais un article dans le futur pour faire autrement et pour avoir un pilotage par la domotique.
Edit 12/06/2020: Une des solutions consiste à autoriser le SSH via whitelist avec la commande suivante :
nordvpn whitelist add port 22
7) Attention pour le NAT... le nom de l'interface virtuel change :
(au lieu de tun0, c'est nordlynx maintenant comme vous pouvez le voir ci-après)
pi@raspberrypi:~ $ ifconfig
eth0: flags=4163<UP,BROADCAST,RUNNING,MULTICAST>  mtu 1500
        inet 192.168.0.150  netmask 255.255.255.0  broadcast 192.168.0.255
        ether b8:27:eb:f1:e7:f9  txqueuelen 1000  (Ethernet)
        RX packets 17780  bytes 2084254 (1.9 MiB)
        RX errors 0  dropped 0  overruns 0  frame 0
        TX packets 2675  bytes 1163905 (1.1 MiB)
        TX errors 0  dropped 0 overruns 0  carrier 0  collisions 0

lo: flags=73<UP,LOOPBACK,RUNNING>  mtu 65536
        inet 127.0.0.1  netmask 255.0.0.0
        loop  txqueuelen 1000  (Local Loopback)
        RX packets 0  bytes 0 (0.0 B)
        RX errors 0  dropped 0  overruns 0  frame 0
        TX packets 0  bytes 0 (0.0 B)
        TX errors 0  dropped 0 overruns 0  carrier 0  collisions 0

nordlynx: flags=4305<UP,POINTOPOINT,RUNNING,NOARP,MULTICAST>  mtu 1420
        inet 10.5.0.2  netmask 255.255.0.0  destination 10.5.0.2
        unspec 00-00-00-00-00-00-00-00-00-00-00-00-00-00-00-00  txqueuelen 500  (UNSPEC)
        RX packets 0  bytes 0 (0.0 B)
        RX errors 0  dropped 0  overruns 0  frame 0
        TX packets 1  bytes 48 (48.0 B)
        TX errors 0  dropped 0 overruns 0  carrier 0  collisions 0
8) Donc on active le NAT maintenant pour cet interface:
sudo iptables -t nat -A POSTROUTING -o nordlynx -j MASQUERADE
Et on redirige les traffics entrant/sortant dans cet interface de ce VPN::
sudo iptables -A FORWARD -i eth0 -o nordlynx -j ACCEPT
sudo iptables -A FORWARD -i nordlynx -o eth0 -m state --state RELATED,ESTABLISHED -j ACCEPT
9) Pour finir on lance la commande pour sauvegarder la configuration et rendre cela permanent après reboot :
(si cela ne marche pas, vous n'avez pas fait le tuto précédent surement et installé ce qu'il faut ou vous n'êtes pas sur debian ou raspbian ;-)
sudo netfilter-persistent save
Et voilà c'est fini pour utiliser la technologie NordLynx !
Enjoy !!!
P.S: pendant mes manipulations j'ai fait des erreurs, si besoin il faudra faire un cleaning de l'iptable avec ces commandes avant de la refaire:
sudo iptables -F
sudo iptables -X
sudo iptables -t nat -F
sudo iptables -t nat -X
sudo iptables -t mangle -F
sudo iptables -t mangle -X
sudo iptables -P INPUT ACCEPT
sudo iptables -P FORWARD ACCEPT
sudo iptables -P OUTPUT ACCEPT
Aucun commentaire :
Enregistrer un commentaire